by PhotoSpin, Inc.
To inspect a document for hidden data in Word 2007 under the office button select prepare>inspect document. Next select the options that you want inspected and click on the inspect button. The results of the inspection will be displayed in the document inspector dialog box. You can now remove the hidden data that you do not want to appear in the final document. After removing your hidden data, you can mark the document as final. To do this, under the office button choose prepare>mark as final.
Monday, October 19, 2009


Tuesday, September 1, 2009
InDesign - Text On A Path
by John Feld
The Graphics Report
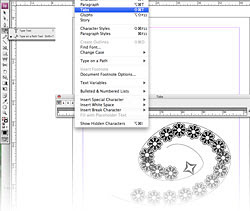 For some fun effects try creating a path, then attach type to it with the Type on a Path tool. First place a tab followed by an interesting character, then using the Tab
dialog, set the tab leader with some interesting dingbat from a
dingbat font. This works well with all sorts of characters such as
snowflakes and musical notes if you have the font Sonata.
If you have a long path you may have to extend the tab dialog quite a
ways to cover the whole path.
The Graphics Report
 For some fun effects try creating a path, then attach type to it with the Type on a Path tool. First place a tab followed by an interesting character, then using the Tab
 dialog, set the tab leader with some interesting dingbat from a
dingbat font. This works well with all sorts of characters such as
snowflakes and musical notes if you have the font Sonata.
If you have a long path you may have to extend the tab dialog quite a
ways to cover the whole path.
Wednesday, July 29, 2009
PowerPoint 2003 - Inserting an Equation Editor icon
by Geetesh Bajaj
www.cuttingedgeppt.com
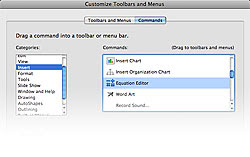 If you use equations often in your presentations, you'll want an equation
Editor icon in one of the toolbars:
1. Choose View | Toolbar | Customize to bring up the Customize dialog box.
2. Click the Command tab.
3. Choose the Insert option in the categories area.
4. In the command area, select Equation Editor and then drag its icon to any
location on any visible toolbar.
www.cuttingedgeppt.com
 If you use equations often in your presentations, you'll want an equation
Editor icon in one of the toolbars:
1. Choose View | Toolbar | Customize to bring up the Customize dialog box.
2. Click the Command tab.
3. Choose the Insert option in the categories area.
4. In the command area, select Equation Editor and then drag its icon to any
location on any visible toolbar.
Thursday, June 25, 2009
Photoshop - Easily adjust the amount of space between letters.
by Steve Dow
www.elijournals.com
 If you want to adjust the letter tracking, or spacing, across a range of letters, you don't have to mess around with entering specific values in the Tracking text box in the Character palette. Instead, you can use key commands. To tighten the spacing between letters, highlight your text with the Horizontal Type tool (Type tool in versions 6) and then press [option][left arrow] on the Mac and [Alt][Left Arrow] in Windows; and to add more space, press [option][right arrow] on the Mac and [Alt][Right Arrow] in Windows.
Read more...
www.elijournals.com
 If you want to adjust the letter tracking, or spacing, across a range of letters, you don't have to mess around with entering specific values in the Tracking text box in the Character palette. Instead, you can use key commands. To tighten the spacing between letters, highlight your text with the Horizontal Type tool (Type tool in versions 6) and then press [option][left arrow] on the Mac and [Alt][Left Arrow] in Windows; and to add more space, press [option][right arrow] on the Mac and [Alt][Right Arrow] in Windows.
Read more...
Monday, May 11, 2009
Photoshop CS3 - RGB to CMYK
by Ted LoCascio
www.tedlocascio.com
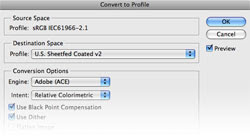 If you are preparing your images for final output on a commercial printing device, you will want to convert your images to CMYK using a working CMYK color profile for the final output device and paper on which you will be printing your images.
Where do you indicate to Photoshop the type of printing press and paper on which you will be printing your images?
Using either your Color Setting dialog or the Convert to Profile dialog (Edit>Convert to Profile) assign the CMYK destination profile and conversion options for the printing press and paper on which you will be printing and convert a copy of your RGB image to CMYK for printing.
Read more...
www.tedlocascio.com
 If you are preparing your images for final output on a commercial printing device, you will want to convert your images to CMYK using a working CMYK color profile for the final output device and paper on which you will be printing your images.
Where do you indicate to Photoshop the type of printing press and paper on which you will be printing your images?
Using either your Color Setting dialog or the Convert to Profile dialog (Edit>Convert to Profile) assign the CMYK destination profile and conversion options for the printing press and paper on which you will be printing and convert a copy of your RGB image to CMYK for printing.
Read more...
Thursday, April 16, 2009
Photoshop - Expanding a selection
by Ted LoCascio
www.tedlocascio.com
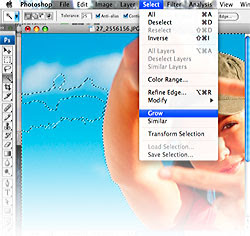 You can expand an existing selection by applying either the Grow or the Similar command in Photoshop CS3. These commands can be applied to any type of selection, but they are best used to expand those you’ve made with the Magic Wand tool. Each command adds pixels to your selection based on the current Tolerance setting.
Choose Select>Grow to add only contiguous (adjacent) pixels to an existing selection. To add both contiguous and noncontiguous pixels to a selection, choose Select>Similar.
The difference between the two commands is comparable to making a Magic Wand selection with the Contiguous option turned on or off.
Read more...
www.tedlocascio.com
 You can expand an existing selection by applying either the Grow or the Similar command in Photoshop CS3. These commands can be applied to any type of selection, but they are best used to expand those you’ve made with the Magic Wand tool. Each command adds pixels to your selection based on the current Tolerance setting.
Choose Select>Grow to add only contiguous (adjacent) pixels to an existing selection. To add both contiguous and noncontiguous pixels to a selection, choose Select>Similar.
The difference between the two commands is comparable to making a Magic Wand selection with the Contiguous option turned on or off.
Read more...
Wednesday, April 8, 2009
Photoshop - Determining the resolution
by Nathan Segal
Corel-photo-paint.com
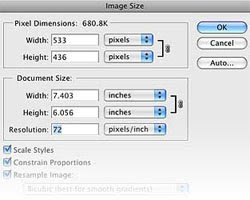 As a quick reference, Web images use a resolution of 72dpi. Newspapers use resolutions ranging from 125dpi to 170dpi. High-quality brochures and magazines use resolutions ranging from 200dpi to 400dpi. And for books, the range is generally from 175dpi to 350dpi. These measurements refer to 300 dpi at an output size of 8.5 x 11 inches, as an example.
Read more...
Corel-photo-paint.com
 As a quick reference, Web images use a resolution of 72dpi. Newspapers use resolutions ranging from 125dpi to 170dpi. High-quality brochures and magazines use resolutions ranging from 200dpi to 400dpi. And for books, the range is generally from 175dpi to 350dpi. These measurements refer to 300 dpi at an output size of 8.5 x 11 inches, as an example.
Read more...
Subscribe to:
Posts (Atom)