 Whenever you add a new layer to the Layers palette, it’s always placed above the current active layer. Or, in the case of CS2/CS3, it’s placed above the top most active layers when multiple layers are selected. But there are ways to override this and precisely control where your new layers are placed. First, select the layer just below where you want the new layer placed and add your layer. Or, if you already have a layer active and want the new layer to be located below it in the stacking order, simply [command]-click ([Ctrl]-click in Windows) on the Create A New Layer button at the base of the Layers palette.
Showing posts with label photoshop cs3. Show all posts
Showing posts with label photoshop cs3. Show all posts
Wednesday, December 9, 2009
Photoshop 7/CS/CS2/CS3 - New Layer Shortcut
by Elijournals
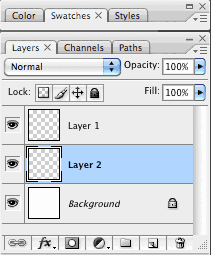 Whenever you add a new layer to the Layers palette, it’s always placed above the current active layer. Or, in the case of CS2/CS3, it’s placed above the top most active layers when multiple layers are selected. But there are ways to override this and precisely control where your new layers are placed. First, select the layer just below where you want the new layer placed and add your layer. Or, if you already have a layer active and want the new layer to be located below it in the stacking order, simply [command]-click ([Ctrl]-click in Windows) on the Create A New Layer button at the base of the Layers palette.
Whenever you add a new layer to the Layers palette, it’s always placed above the current active layer. Or, in the case of CS2/CS3, it’s placed above the top most active layers when multiple layers are selected. But there are ways to override this and precisely control where your new layers are placed. First, select the layer just below where you want the new layer placed and add your layer. Or, if you already have a layer active and want the new layer to be located below it in the stacking order, simply [command]-click ([Ctrl]-click in Windows) on the Create A New Layer button at the base of the Layers palette.


Monday, May 11, 2009
Photoshop CS3 - RGB to CMYK
by Ted LoCascio
www.tedlocascio.com
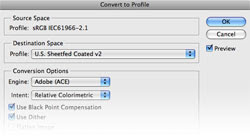 If you are preparing your images for final output on a commercial printing device, you will want to convert your images to CMYK using a working CMYK color profile for the final output device and paper on which you will be printing your images.
Where do you indicate to Photoshop the type of printing press and paper on which you will be printing your images?
Using either your Color Setting dialog or the Convert to Profile dialog (Edit>Convert to Profile) assign the CMYK destination profile and conversion options for the printing press and paper on which you will be printing and convert a copy of your RGB image to CMYK for printing.
Read more...
www.tedlocascio.com
 If you are preparing your images for final output on a commercial printing device, you will want to convert your images to CMYK using a working CMYK color profile for the final output device and paper on which you will be printing your images.
Where do you indicate to Photoshop the type of printing press and paper on which you will be printing your images?
Using either your Color Setting dialog or the Convert to Profile dialog (Edit>Convert to Profile) assign the CMYK destination profile and conversion options for the printing press and paper on which you will be printing and convert a copy of your RGB image to CMYK for printing.
Read more...
Thursday, April 16, 2009
Photoshop - Expanding a selection
by Ted LoCascio
www.tedlocascio.com
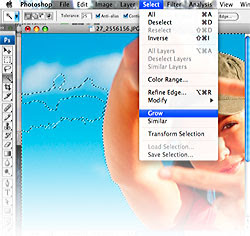 You can expand an existing selection by applying either the Grow or the Similar command in Photoshop CS3. These commands can be applied to any type of selection, but they are best used to expand those you’ve made with the Magic Wand tool. Each command adds pixels to your selection based on the current Tolerance setting.
Choose Select>Grow to add only contiguous (adjacent) pixels to an existing selection. To add both contiguous and noncontiguous pixels to a selection, choose Select>Similar.
The difference between the two commands is comparable to making a Magic Wand selection with the Contiguous option turned on or off.
Read more...
www.tedlocascio.com
 You can expand an existing selection by applying either the Grow or the Similar command in Photoshop CS3. These commands can be applied to any type of selection, but they are best used to expand those you’ve made with the Magic Wand tool. Each command adds pixels to your selection based on the current Tolerance setting.
Choose Select>Grow to add only contiguous (adjacent) pixels to an existing selection. To add both contiguous and noncontiguous pixels to a selection, choose Select>Similar.
The difference between the two commands is comparable to making a Magic Wand selection with the Contiguous option turned on or off.
Read more...
Monday, March 30, 2009
Photoshop CS3 - Soft Proof
by Ted LoCascio
www.tedlocascio.com
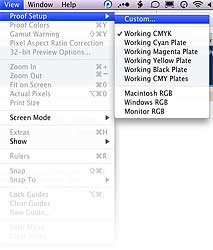 You can create a soft proof to preview your images onscreen to see how your images will appear when you print them. The accuracy of your soft proof will depend upon having a calibrated monitor and properly specifying output conditions. What’s the best way to go about this? Obtain an external monitor calibration kit and calibrate your monitor. Using the Customize Proof Setup dialog (View>Proof Setup>Custom), specify the output profile for your final print device and printing conditions, and then turn on the proof preview.
Read more...
www.tedlocascio.com
 You can create a soft proof to preview your images onscreen to see how your images will appear when you print them. The accuracy of your soft proof will depend upon having a calibrated monitor and properly specifying output conditions. What’s the best way to go about this? Obtain an external monitor calibration kit and calibrate your monitor. Using the Customize Proof Setup dialog (View>Proof Setup>Custom), specify the output profile for your final print device and printing conditions, and then turn on the proof preview.
Read more...
Subscribe to:
Posts (Atom)