by www.elijournals.com
In Photoshop, when you have the Text tool selected, pressing v on the keyboard switches to the Move tool. However, if you have an active text box (bounding box showing), you’ll find out that instead of selecting the Move tool, Photoshop types v into the text box. So first, you have to deactivate the text box.
InDesign and Photoshop do have their similarities, but this is one area of difference: If you press [esc] while in an active text box, Photoshop removes the text layer. So that won’t work! One way to deactivate an active text box is to click on the text layer just to the right of the layer thumbnail, so the layer is still selected but the text box is not active anymore. When you do so, the bounding box handles will disappear. But an even easier way to deactivate a text box is to just press [enter] (not return). Then press v to activate the Move tool.
Tuesday, July 20, 2010
Thursday, June 24, 2010
Adobe Photoshop - Create Funky Backgrounds
www.elijournals.com
Background patterns have many uses including sprucing up your collages and other Photoshop designs. But you don't always have to rely on stock art; you can create your own funky background design with the help of Photoshop's Polar Coordinates filter.
To create a funky background in Photoshop:
1 Create a new Photoshop document.
2 Your pattern will have two colors. Fill the canvas with the first color of your choice, and then set the foreground color to the second color of your choice. We filled our canvas with a bright green and set the foreground color to a darker green.
3 Choose the Gradient tool from the Tools panel and select the Linear Gradient button on the tool Options bar.
4 Select the Transparent Stripes preset gradient and click and drag on your document window to fill it with the gradient. The direction you click and drag is up to you. You can see our example in Figure A.
Figure A:

5 Choose Filter > Distort > Polar Coordinates to open the Polar Coordinates dialog box.
6 Select the Polar To Rectangular option button and click OK.
7 Reapply the filter one to three times by pressing [command]F ([Ctrl]F in Windows). We reapplied the filter just once for results shown in Figure B.
Figure B:
Background patterns have many uses including sprucing up your collages and other Photoshop designs. But you don't always have to rely on stock art; you can create your own funky background design with the help of Photoshop's Polar Coordinates filter.
To create a funky background in Photoshop:
1 Create a new Photoshop document.
2 Your pattern will have two colors. Fill the canvas with the first color of your choice, and then set the foreground color to the second color of your choice. We filled our canvas with a bright green and set the foreground color to a darker green.
3 Choose the Gradient tool from the Tools panel and select the Linear Gradient button on the tool Options bar.
4 Select the Transparent Stripes preset gradient and click and drag on your document window to fill it with the gradient. The direction you click and drag is up to you. You can see our example in Figure A.
Figure A:
5 Choose Filter > Distort > Polar Coordinates to open the Polar Coordinates dialog box.
6 Select the Polar To Rectangular option button and click OK.
7 Reapply the filter one to three times by pressing [command]F ([Ctrl]F in Windows). We reapplied the filter just once for results shown in Figure B.
Figure B:
Labels:
backgrounds,
create,
filters,
funky,
photoshop,
polar coordinates,
tip,
tutorials
Monday, May 17, 2010
PowerPoint 2002 & 2003 - Add Shapes
Geetesh Bajaj
Author of Cutting Edge PowerPoint for Dummies
www.cuttingedgeppt.com
Author of Cutting Edge PowerPoint for Dummies
www.cuttingedgeppt.com
1. Select an existing shape within the Organization Chart and right click it.
2. In the resultant menu, choose either Subordinate, Coworker or Assistant depending upon the type of new shape you want to add.
Friday, April 9, 2010
Photoshop 7/CS/CS2/CS3 - Creating Fog
by Elijournals
There are different ways you can add fog to an image in Photoshop. How much control you need over the fog placement will determine which method you use, but we’ll show you two ways to get you started.
Read the Full Tutorial
There are different ways you can add fog to an image in Photoshop. How much control you need over the fog placement will determine which method you use, but we’ll show you two ways to get you started.
Read the Full Tutorial
Tuesday, February 9, 2010
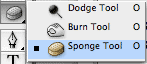
Photoshop 7/CS/CS2/CS3 - Sponge Tool
by PhotoSpin
Bring out your subjects in Photoshop using the sponge tool.
An easy way to bring out your subjects in Photoshop is to use the sponge tool. The Sponge tool 'paints on' increased or decreased saturation.
Here's how to do it:
Using a soft edge and the Saturation blend mode, brush over the part in your design that you want to emphasize. Joilá! The heightened saturation will make it pop out.
Just be sure not to overdo it.
Bring out your subjects in Photoshop using the sponge tool.An easy way to bring out your subjects in Photoshop is to use the sponge tool. The Sponge tool 'paints on' increased or decreased saturation.
Here's how to do it:
Using a soft edge and the Saturation blend mode, brush over the part in your design that you want to emphasize. Joilá! The heightened saturation will make it pop out.
Just be sure not to overdo it.
Thursday, January 21, 2010
Accent Marks
Do you ever wonder how to type those nifty little accent marks over certain words like touché?
Being able to type characters with accents over them gives extra meaning and sound to the words. Whether you're writing a personal letter or a blog post, knowing how to easily include special characters and symbols is useful.
Here's how to do it:
Mac users:
Here's how to do it:
Mac users:
Option + e, the letter (á, é, í, ó, ú)
Option + `, the letter (è,à, ì, ò, ù)
PC users:
*The numeric keypad must be used, with Num Lock on. The modified letter appears after the keys are pressed and released.
ALT + 0224 = à
ALT + 0232 = è
ALT + 0242 = ò
ALT + 0225 = á
ALT + 0233 = é
ALT + 0243 = ó
Wednesday, December 9, 2009
Photoshop 7/CS/CS2/CS3 - New Layer Shortcut
by Elijournals
Whenever you add a new layer to the Layers palette, it’s always placed above the current active layer. Or, in the case of CS2/CS3, it’s placed above the top most active layers when multiple layers are selected. But there are ways to override this and precisely control where your new layers are placed. First, select the layer just below where you want the new layer placed and add your layer. Or, if you already have a layer active and want the new layer to be located below it in the stacking order, simply [command]-click ([Ctrl]-click in Windows) on the Create A New Layer button at the base of the Layers palette.
Monday, October 19, 2009
Word 2007 - Inspecting a Document for Hidden Data
by PhotoSpin, Inc.
To inspect a document for hidden data in Word 2007 under the office button select prepare>inspect document. Next select the options that you want inspected and click on the inspect button. The results of the inspection will be displayed in the document inspector dialog box. You can now remove the hidden data that you do not want to appear in the final document. After removing your hidden data, you can mark the document as final. To do this, under the office button choose prepare>mark as final.
Tuesday, September 1, 2009
InDesign - Text On A Path
by John Feld
The Graphics Report
For some fun effects try creating a path, then attach type to it with the Type on a Path tool. First place a tab followed by an interesting character, then using the Tab
dialog, set the tab leader with some interesting dingbat from a
dingbat font. This works well with all sorts of characters such as
snowflakes and musical notes if you have the font Sonata.
If you have a long path you may have to extend the tab dialog quite a
ways to cover the whole path.
The Graphics Report
For some fun effects try creating a path, then attach type to it with the Type on a Path tool. First place a tab followed by an interesting character, then using the Tab dialog, set the tab leader with some interesting dingbat from a
dingbat font. This works well with all sorts of characters such as
snowflakes and musical notes if you have the font Sonata.
If you have a long path you may have to extend the tab dialog quite a
ways to cover the whole path.
Wednesday, July 29, 2009
PowerPoint 2003 - Inserting an Equation Editor icon
by Geetesh Bajaj
www.cuttingedgeppt.com
If you use equations often in your presentations, you'll want an equation
Editor icon in one of the toolbars:
1. Choose View | Toolbar | Customize to bring up the Customize dialog box.
2. Click the Command tab.
3. Choose the Insert option in the categories area.
4. In the command area, select Equation Editor and then drag its icon to any
location on any visible toolbar.
www.cuttingedgeppt.com
If you use equations often in your presentations, you'll want an equationEditor icon in one of the toolbars:
1. Choose View | Toolbar | Customize to bring up the Customize dialog box.
2. Click the Command tab.
3. Choose the Insert option in the categories area.
4. In the command area, select Equation Editor and then drag its icon to any
location on any visible toolbar.
Thursday, June 25, 2009
Photoshop - Easily adjust the amount of space between letters.
by Steve Dow
www.elijournals.com
If you want to adjust the letter tracking, or spacing, across a range of letters, you don't have to mess around with entering specific values in the Tracking text box in the Character palette. Instead, you can use key commands. To tighten the spacing between letters, highlight your text with the Horizontal Type tool (Type tool in versions 6) and then press [option][left arrow] on the Mac and [Alt][Left Arrow] in Windows; and to add more space, press [option][right arrow] on the Mac and [Alt][Right Arrow] in Windows.
Read more...
www.elijournals.com
If you want to adjust the letter tracking, or spacing, across a range of letters, you don't have to mess around with entering specific values in the Tracking text box in the Character palette. Instead, you can use key commands. To tighten the spacing between letters, highlight your text with the Horizontal Type tool (Type tool in versions 6) and then press [option][left arrow] on the Mac and [Alt][Left Arrow] in Windows; and to add more space, press [option][right arrow] on the Mac and [Alt][Right Arrow] in Windows.Read more...
Monday, May 11, 2009
Photoshop CS3 - RGB to CMYK
by Ted LoCascio
www.tedlocascio.com
If you are preparing your images for final output on a commercial printing device, you will want to convert your images to CMYK using a working CMYK color profile for the final output device and paper on which you will be printing your images.
Where do you indicate to Photoshop the type of printing press and paper on which you will be printing your images?
Using either your Color Setting dialog or the Convert to Profile dialog (Edit>Convert to Profile) assign the CMYK destination profile and conversion options for the printing press and paper on which you will be printing and convert a copy of your RGB image to CMYK for printing.
Read more...
www.tedlocascio.com
If you are preparing your images for final output on a commercial printing device, you will want to convert your images to CMYK using a working CMYK color profile for the final output device and paper on which you will be printing your images.Where do you indicate to Photoshop the type of printing press and paper on which you will be printing your images?
Using either your Color Setting dialog or the Convert to Profile dialog (Edit>Convert to Profile) assign the CMYK destination profile and conversion options for the printing press and paper on which you will be printing and convert a copy of your RGB image to CMYK for printing.
Read more...
Thursday, April 16, 2009
Photoshop - Expanding a selection
by Ted LoCascio
www.tedlocascio.com
You can expand an existing selection by applying either the Grow or the Similar command in Photoshop CS3. These commands can be applied to any type of selection, but they are best used to expand those you’ve made with the Magic Wand tool. Each command adds pixels to your selection based on the current Tolerance setting.
Choose Select>Grow to add only contiguous (adjacent) pixels to an existing selection. To add both contiguous and noncontiguous pixels to a selection, choose Select>Similar.
The difference between the two commands is comparable to making a Magic Wand selection with the Contiguous option turned on or off.
Read more...
www.tedlocascio.com
You can expand an existing selection by applying either the Grow or the Similar command in Photoshop CS3. These commands can be applied to any type of selection, but they are best used to expand those you’ve made with the Magic Wand tool. Each command adds pixels to your selection based on the current Tolerance setting.Choose Select>Grow to add only contiguous (adjacent) pixels to an existing selection. To add both contiguous and noncontiguous pixels to a selection, choose Select>Similar.
The difference between the two commands is comparable to making a Magic Wand selection with the Contiguous option turned on or off.
Read more...
Labels:
expanding selection,
photoshop,
photoshop cs3,
selection
Wednesday, April 8, 2009
Photoshop - Determining the resolution
by Nathan Segal
Corel-photo-paint.com
As a quick reference, Web images use a resolution of 72dpi. Newspapers use resolutions ranging from 125dpi to 170dpi. High-quality brochures and magazines use resolutions ranging from 200dpi to 400dpi. And for books, the range is generally from 175dpi to 350dpi. These measurements refer to 300 dpi at an output size of 8.5 x 11 inches, as an example.
Read more...
Corel-photo-paint.com
As a quick reference, Web images use a resolution of 72dpi. Newspapers use resolutions ranging from 125dpi to 170dpi. High-quality brochures and magazines use resolutions ranging from 200dpi to 400dpi. And for books, the range is generally from 175dpi to 350dpi. These measurements refer to 300 dpi at an output size of 8.5 x 11 inches, as an example.Read more...
Monday, March 30, 2009
Photoshop CS3 - Soft Proof
by Ted LoCascio
www.tedlocascio.com
You can create a soft proof to preview your images onscreen to see how your images will appear when you print them. The accuracy of your soft proof will depend upon having a calibrated monitor and properly specifying output conditions. What’s the best way to go about this? Obtain an external monitor calibration kit and calibrate your monitor. Using the Customize Proof Setup dialog (View>Proof Setup>Custom), specify the output profile for your final print device and printing conditions, and then turn on the proof preview.
Read more...
www.tedlocascio.com
You can create a soft proof to preview your images onscreen to see how your images will appear when you print them. The accuracy of your soft proof will depend upon having a calibrated monitor and properly specifying output conditions. What’s the best way to go about this? Obtain an external monitor calibration kit and calibrate your monitor. Using the Customize Proof Setup dialog (View>Proof Setup>Custom), specify the output profile for your final print device and printing conditions, and then turn on the proof preview.Read more...
Labels:
how to,
photoshop,
photoshop cs3,
proofing color
Friday, November 7, 2008
Photoshop - Proper File Extensions
by Amy Palermo
Eli Journals
Many servers are case sensitive when it comes to recognizing file names. When you save Photoshop files, if you notice that Photoshop capitalizes all of your filename extensions, such as .GIF, .JPG and .PNG, don’t despair! There is a quick way to set Photoshop to append lowercase filename extensions:
1. Choose Photoshop > Preferences > File Handling (Edit > Preferences > File Handling in Windows).
2. Choose Always from the Append File Extensions pop-up menu.
3. Select the Use Lower Case option, and click OK.
Read more...
Eli Journals
Many servers are case sensitive when it comes to recognizing file names. When you save Photoshop files, if you notice that Photoshop capitalizes all of your filename extensions, such as .GIF, .JPG and .PNG, don’t despair! There is a quick way to set Photoshop to append lowercase filename extensions:1. Choose Photoshop > Preferences > File Handling (Edit > Preferences > File Handling in Windows).
2. Choose Always from the Append File Extensions pop-up menu.
3. Select the Use Lower Case option, and click OK.
Read more...
InDesign - Alphabetize Menus
by John Feld
The Graphics Report
If you are having trouble finding things in menus, try sorting the menu items into an alphabetical list. Doing this may make it easier to find items. Press Command + Option + Shift (Mac) or Ctrl + Alt + Shift (Windows) and click on a menu with the keys held down. The items will be listed alphabetically. Even the sub-menus will be alphabetized. It will immediately revert to regular next time you select a menu unless you hold down those same keys, so nothing is changed permanently.
Read more...
The Graphics Report
If you are having trouble finding things in menus, try sorting the menu items into an alphabetical list. Doing this may make it easier to find items. Press Command + Option + Shift (Mac) or Ctrl + Alt + Shift (Windows) and click on a menu with the keys held down. The items will be listed alphabetically. Even the sub-menus will be alphabetized. It will immediately revert to regular next time you select a menu unless you hold down those same keys, so nothing is changed permanently.Read more...
Subscribe to:
Posts (Atom)