by Elijournals
There are different ways you can add fog to an image in Photoshop. How much control you need over the fog placement will determine which method you use, but we’ll show you two ways to get you started.
Read the Full Tutorial
Friday, April 9, 2010
Tuesday, February 9, 2010
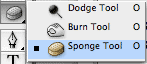
Photoshop 7/CS/CS2/CS3 - Sponge Tool
by PhotoSpin
Bring out your subjects in Photoshop using the sponge tool.
An easy way to bring out your subjects in Photoshop is to use the sponge tool. The Sponge tool 'paints on' increased or decreased saturation.
Here's how to do it:
Using a soft edge and the Saturation blend mode, brush over the part in your design that you want to emphasize. Joilá! The heightened saturation will make it pop out.
Just be sure not to overdo it.
Bring out your subjects in Photoshop using the sponge tool.An easy way to bring out your subjects in Photoshop is to use the sponge tool. The Sponge tool 'paints on' increased or decreased saturation.
Here's how to do it:
Using a soft edge and the Saturation blend mode, brush over the part in your design that you want to emphasize. Joilá! The heightened saturation will make it pop out.
Just be sure not to overdo it.
Thursday, January 21, 2010
Accent Marks
Do you ever wonder how to type those nifty little accent marks over certain words like touché?
Being able to type characters with accents over them gives extra meaning and sound to the words. Whether you're writing a personal letter or a blog post, knowing how to easily include special characters and symbols is useful.
Here's how to do it:
Mac users:
Here's how to do it:
Mac users:
Option + e, the letter (á, é, í, ó, ú)
Option + `, the letter (è,à, ì, ò, ù)
PC users:
*The numeric keypad must be used, with Num Lock on. The modified letter appears after the keys are pressed and released.
ALT + 0224 = à
ALT + 0232 = è
ALT + 0242 = ò
ALT + 0225 = á
ALT + 0233 = é
ALT + 0243 = ó
Wednesday, December 9, 2009
Photoshop 7/CS/CS2/CS3 - New Layer Shortcut
by Elijournals
Whenever you add a new layer to the Layers palette, it’s always placed above the current active layer. Or, in the case of CS2/CS3, it’s placed above the top most active layers when multiple layers are selected. But there are ways to override this and precisely control where your new layers are placed. First, select the layer just below where you want the new layer placed and add your layer. Or, if you already have a layer active and want the new layer to be located below it in the stacking order, simply [command]-click ([Ctrl]-click in Windows) on the Create A New Layer button at the base of the Layers palette.
Monday, October 19, 2009
Word 2007 - Inspecting a Document for Hidden Data
by PhotoSpin, Inc.
To inspect a document for hidden data in Word 2007 under the office button select prepare>inspect document. Next select the options that you want inspected and click on the inspect button. The results of the inspection will be displayed in the document inspector dialog box. You can now remove the hidden data that you do not want to appear in the final document. After removing your hidden data, you can mark the document as final. To do this, under the office button choose prepare>mark as final.
Tuesday, September 1, 2009
InDesign - Text On A Path
by John Feld
The Graphics Report
For some fun effects try creating a path, then attach type to it with the Type on a Path tool. First place a tab followed by an interesting character, then using the Tab
dialog, set the tab leader with some interesting dingbat from a
dingbat font. This works well with all sorts of characters such as
snowflakes and musical notes if you have the font Sonata.
If you have a long path you may have to extend the tab dialog quite a
ways to cover the whole path.
The Graphics Report
For some fun effects try creating a path, then attach type to it with the Type on a Path tool. First place a tab followed by an interesting character, then using the Tab dialog, set the tab leader with some interesting dingbat from a
dingbat font. This works well with all sorts of characters such as
snowflakes and musical notes if you have the font Sonata.
If you have a long path you may have to extend the tab dialog quite a
ways to cover the whole path.
Wednesday, July 29, 2009
PowerPoint 2003 - Inserting an Equation Editor icon
by Geetesh Bajaj
www.cuttingedgeppt.com
If you use equations often in your presentations, you'll want an equation
Editor icon in one of the toolbars:
1. Choose View | Toolbar | Customize to bring up the Customize dialog box.
2. Click the Command tab.
3. Choose the Insert option in the categories area.
4. In the command area, select Equation Editor and then drag its icon to any
location on any visible toolbar.
www.cuttingedgeppt.com
If you use equations often in your presentations, you'll want an equationEditor icon in one of the toolbars:
1. Choose View | Toolbar | Customize to bring up the Customize dialog box.
2. Click the Command tab.
3. Choose the Insert option in the categories area.
4. In the command area, select Equation Editor and then drag its icon to any
location on any visible toolbar.
Subscribe to:
Posts (Atom)
