by www.elijournals.com
In Photoshop, when you have the Text tool selected, pressing v on the keyboard switches to the Move tool. However, if you have an active text box (bounding box showing), you’ll find out that instead of selecting the Move tool, Photoshop types v into the text box. So first, you have to deactivate the text box.
InDesign and Photoshop do have their similarities, but this is one area of difference: If you press [esc] while in an active text box, Photoshop removes the text layer. So that won’t work! One way to deactivate an active text box is to click on the text layer just to the right of the layer thumbnail, so the layer is still selected but the text box is not active anymore. When you do so, the bounding box handles will disappear. But an even easier way to deactivate a text box is to just press [enter] (not return). Then press v to activate the Move tool.
Tips & Tutorials
Free tips and tutorials using Photoshop, Indesign, Illustrator & more.
Tuesday, July 20, 2010
Thursday, June 24, 2010
Adobe Photoshop - Create Funky Backgrounds
www.elijournals.com
Background patterns have many uses including sprucing up your collages and other Photoshop designs. But you don't always have to rely on stock art; you can create your own funky background design with the help of Photoshop's Polar Coordinates filter.
To create a funky background in Photoshop:
1 Create a new Photoshop document.
2 Your pattern will have two colors. Fill the canvas with the first color of your choice, and then set the foreground color to the second color of your choice. We filled our canvas with a bright green and set the foreground color to a darker green.
3 Choose the Gradient tool from the Tools panel and select the Linear Gradient button on the tool Options bar.
4 Select the Transparent Stripes preset gradient and click and drag on your document window to fill it with the gradient. The direction you click and drag is up to you. You can see our example in Figure A.
Figure A:

5 Choose Filter > Distort > Polar Coordinates to open the Polar Coordinates dialog box.
6 Select the Polar To Rectangular option button and click OK.
7 Reapply the filter one to three times by pressing [command]F ([Ctrl]F in Windows). We reapplied the filter just once for results shown in Figure B.
Figure B:

Background patterns have many uses including sprucing up your collages and other Photoshop designs. But you don't always have to rely on stock art; you can create your own funky background design with the help of Photoshop's Polar Coordinates filter.
To create a funky background in Photoshop:
1 Create a new Photoshop document.
2 Your pattern will have two colors. Fill the canvas with the first color of your choice, and then set the foreground color to the second color of your choice. We filled our canvas with a bright green and set the foreground color to a darker green.
3 Choose the Gradient tool from the Tools panel and select the Linear Gradient button on the tool Options bar.
4 Select the Transparent Stripes preset gradient and click and drag on your document window to fill it with the gradient. The direction you click and drag is up to you. You can see our example in Figure A.
Figure A:
5 Choose Filter > Distort > Polar Coordinates to open the Polar Coordinates dialog box.
6 Select the Polar To Rectangular option button and click OK.
7 Reapply the filter one to three times by pressing [command]F ([Ctrl]F in Windows). We reapplied the filter just once for results shown in Figure B.
Figure B:
Labels:
backgrounds,
create,
filters,
funky,
photoshop,
polar coordinates,
tip,
tutorials
Monday, May 17, 2010
PowerPoint 2002 & 2003 - Add Shapes
Geetesh Bajaj
Author of Cutting Edge PowerPoint for Dummies
www.cuttingedgeppt.com
Author of Cutting Edge PowerPoint for Dummies
www.cuttingedgeppt.com
1. Select an existing shape within the Organization Chart and right click it.
2. In the resultant menu, choose either Subordinate, Coworker or Assistant depending upon the type of new shape you want to add.
2. In the resultant menu, choose either Subordinate, Coworker or Assistant depending upon the type of new shape you want to add.
Friday, April 9, 2010
Photoshop 7/CS/CS2/CS3 - Creating Fog
by Elijournals
There are different ways you can add fog to an image in Photoshop. How much control you need over the fog placement will determine which method you use, but we’ll show you two ways to get you started.
Read the Full Tutorial
There are different ways you can add fog to an image in Photoshop. How much control you need over the fog placement will determine which method you use, but we’ll show you two ways to get you started.
Read the Full Tutorial
Tuesday, February 9, 2010
Photoshop 7/CS/CS2/CS3 - Sponge Tool
by PhotoSpin
 Bring out your subjects in Photoshop using the sponge tool.
An easy way to bring out your subjects in Photoshop is to use the sponge tool. The Sponge tool 'paints on' increased or decreased saturation.
Here's how to do it:
Using a soft edge and the Saturation blend mode, brush over the part in your design that you want to emphasize. Joilá! The heightened saturation will make it pop out.
Just be sure not to overdo it.
Thursday, January 21, 2010
Accent Marks
Do you ever wonder how to type those nifty little accent marks over certain words like touché?
Being able to type characters with accents over them gives extra meaning and sound to the words. Whether you're writing a personal letter or a blog post, knowing how to easily include special characters and symbols is useful.
Here's how to do it:
Mac users:
Here's how to do it:
Mac users:
Option + e, the letter (á, é, í, ó, ú)
Option + `, the letter (è,à, ì, ò, ù)
PC users:
*The numeric keypad must be used, with Num Lock on. The modified letter appears after the keys are pressed and released.
ALT + 0224 = à
ALT + 0232 = è
ALT + 0242 = ò
ALT + 0225 = á
ALT + 0233 = é
ALT + 0243 = ó
Wednesday, December 9, 2009
Photoshop 7/CS/CS2/CS3 - New Layer Shortcut
by Elijournals
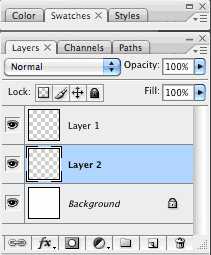
 Whenever you add a new layer to the Layers palette, it’s always placed above the current active layer. Or, in the case of CS2/CS3, it’s placed above the top most active layers when multiple layers are selected. But there are ways to override this and precisely control where your new layers are placed. First, select the layer just below where you want the new layer placed and add your layer. Or, if you already have a layer active and want the new layer to be located below it in the stacking order, simply [command]-click ([Ctrl]-click in Windows) on the Create A New Layer button at the base of the Layers palette.
 Whenever you add a new layer to the Layers palette, it’s always placed above the current active layer. Or, in the case of CS2/CS3, it’s placed above the top most active layers when multiple layers are selected. But there are ways to override this and precisely control where your new layers are placed. First, select the layer just below where you want the new layer placed and add your layer. Or, if you already have a layer active and want the new layer to be located below it in the stacking order, simply [command]-click ([Ctrl]-click in Windows) on the Create A New Layer button at the base of the Layers palette.
Subscribe to:
Comments (Atom)

